
How To Connect With New Extender
The Netgear WiFi Range Extender Setup is basically a plug and play device and very easy to set up, Below-Mentioned is Step-By-Step Guide to install your Netgear WiFi Extender Setup.
Step-by-Step Login Tutorial for New Extender
- Step-1: Power on your Netgear WiFi range extender into an electrical outlet.
- Step-2:Turn on and attach your PC or laptop to a network.
- Step-3:On it, open a web browser.
- Step-4:In the address bar, enter new extender setup
- Step-5: Enter the default login credential for new extender setup.
- Step-6:Carefully type the user name and password. Click on the login tab until completed.

Link the client computers to the old ones following the performance of extender configuration. When done, all your users can get peerless internet speed on all your devices in the house. If you are trapped at some stage, you can contact the experts for personal and urgent assistance at any time.
How to Setup New Wi-Fi Extender?

- Plugin the New WiFi Range Extender to a socket.
- Turn on the laptop and open a web browser.
- Type 192.168.1.250 in the address bar.
- Use an email or password to create an account.
- Once done, login page will be displayed on the screen.
- Choose the network of the router.
- Fill in the password and click on the Continue button.
- It will open the Genie Smart Setup page.
- Create a secure connection between WiFi-supported smart devices and the extender network.
- Finally, click on the Finish button.
Why do I need a WIFI range extender?
Wi-Fi range extenders can provide numerous advantages. Here are key points that highlight the need for one:
- Expanded Coverage: Wi-Fi range extenders amplify your router’s signal, expanding coverage across larger areas, multiple floors, or rooms with thick walls.
2. Boosts Signal Strength: They strengthen the Wi-Fi signal in areas where it’s weak or non-existent, providing a consistent and robust internet connection.
3. Supports Modern Innovation: Many modern devices, from smartphones and laptops to smart TVs and home automation systems, require stable Wi-Fi connectivity. An extender ensures these devices perform optimally.
4. Facilitates Remote Work and Learning: With more people working or studying from home, a reliable and wide-reaching Wi-Fi connection is essential. An extender ensures no important work calls or lessons are interrupted due to poor connectivity.
5. Improves User Experience: Wi-Fi extenders eliminate the need to stay close to the router for a stable connection. They ensure a smooth internet experience, regardless of your location within the coverage area.
6. Supports Streaming and Gaming: Buffering and lag can ruin your streaming or gaming experience. An extender ensures a robust connection, providing a seamless entertainment experience.

New Extender Login is Working or not?
The wifi goes extender has various signs that show up if it has adequately organized and working or not. There are LED lights on the extender that shows up if it’s on and working, the framework name also that appears after the extender is plan viably shows it has related and is in working condition. You can see the once-over underneath –
- - In the event like wn3000rpv is working you will see the solid green power LED turned on
- - The lift and addition in wifi signal quality and speed will confirm that the Extender is working
- - On the off chance that the extender orchestrate SSID appears in the exhibited framework show, it suggests the extender is readied
- - On the off chance that the wifi-enabled devices are partner with the extender and working outstandingly then it shows extender is working properly
- - On the off chance that the no man’s properties no longer remain as they were earlier and you can see strong wifi signs and system in those regions then your wifi run extender is working in the right way
- - The firmware of the extender setup page isn’t revived it won’t work

How to Do Orbi Setup?
Have you had a Orbi and looking to configure the Wi-Fi device? If so, then you have stumbled upon the right page. Here, we are going to explain each and every step on how to do Orbi router setup. Let’s get started!
- Now, plug in your Orbi satellite to a power socket and turn it on. Note: During the Orbi setup, you are suggested to place your Orbi satellite in the same room where your router is already placed. However, you can change the location of your Orbi satellite once done with the Orbi router setup process.
- Get back to the Orbi app and wait for the progress bar on it to show the starting status of your Orbi router.
- Now, choose a network name and password for your Orbi WiFi system.
- Tap Next and select security questions you want to answer.
- As soon as you are done with answering the questions, hit Continue.
- Unplug the Orbi satellite and place it at your desired location.
That’s all! You have now completed the Orbi setup process. All you need to do now is connect your client devices to the network of your Orbi and start using the internet the way you fancy. Whether you own Orbi RBK50v, RBK50, CBK40, CBK43, CBK752, or CBK753, RBK852 setup steps are given above will work the same for all the Orbi models. However, the list of models supporting the above-given Orbi setup process is endless.
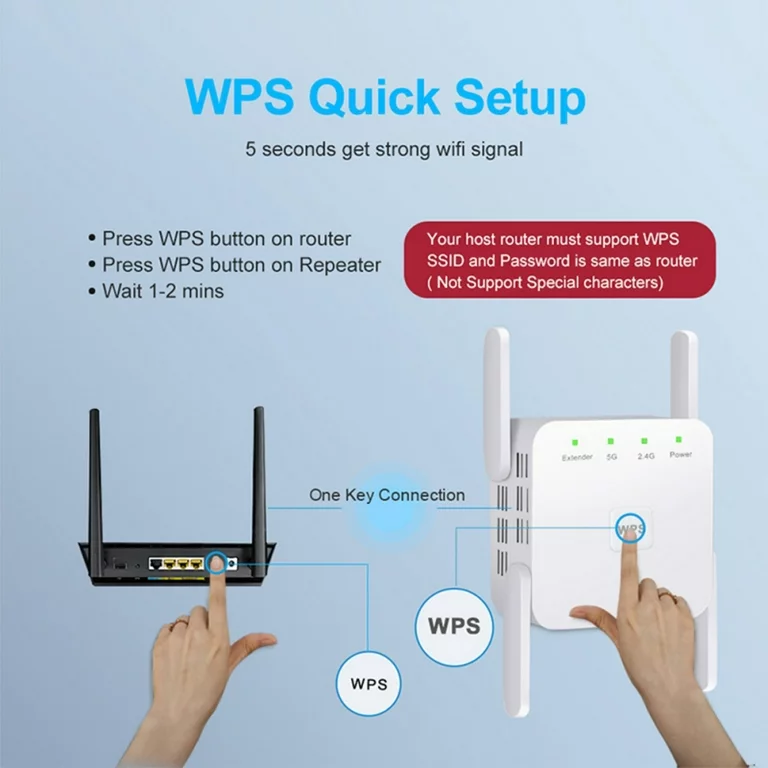
Setup your new extender with WPS method :-
- -Plug in your Wi-Fi extender near your Wi-Fi router and power it on.
- -Press the WPS button on your Wi-Fi router. It's usually labeled and may be on the back or side of the router.
- -Within 2 minutes of pressing the WPS button on the router, press the WPS button on your Wi-Fi extender. The WPS LED on the extender should start blinking.
- -Wait for a few moments until the WPS connection is established between the router and the extender. The WPS LED on both devices should become steady or turn off.
- -Move the Wi-Fi extender to the desired location, ideally in a spot where your Wi-Fi signal is weak.
- -The Wi-Fi extender should now be extending your Wi-Fi network. Connect your devices to the extended network using the same Wi-Fi name and password as your main router.
Setup your New extender with the help of ethernet cable:-
- -Plug in your Wi-Fi extender near your Wi-Fi router and power it on.
- -Connect one end of the Ethernet cable to the Ethernet port on your Wi-Fi router.
- -Connect the other end of the Ethernet cable to the Ethernet port on your Wi-Fi extender.
- -Wait for a moment until the extender establishes a connection with your router. The status LED on the extender should indicate a successful connection.
- -Now, using your smartphone, tablet, or computer, connect to the Wi-Fi network of the extender. The network name (SSID) should be the same as your main router but with "_EXT" or a similar extension added to it.
- -Open a web browser and follow the on-screen instructions to complete the setup process. Typically, you will be asked to provide the Wi-Fi network name and password of your main router to extend it.
- -Once the setup is complete, disconnect the Ethernet cable from the extender and place it in the desired location where you want to extend your Wi-Fi coverage.

How to Create a new Account?
Do I really need to create a www.mywifiext.net account of course, yes! This is the essential requirement to get started with the extender login and setup.
In order to create a mywifiext account, access the http://mywifiext web address via an internet browser. Now, click on the mywifiext.net create account button. Enter all the required details and hit Next. Accessing your account using mywifiext login password will provide you with different sections like those given below.

How do I log into my router with Orbi app?
You can use the Orbi app to access and log into the Orbi router
- First of all, download the Orbi app on your smartphone from the app store.
- Install the app and open it.
- Connect the phone to the Orbi network and you will no sooner find the same login page appears on the screen.
- Enter the username and the password to log in.
- Press ‘Sign-in’ to complete the login process.

Fix ORBI Stuck On Purple or Pink LED Light – Troubleshoot
Reboot Router or Satellite:
- When Orbi gets stuck on solid magenta. Then Try to reboot your WiFi system.
- Switch off, complete Orbi setup. Wait for few seconds.
- After approx 20-30 seconds, turn on the Orbi wifi router and satellite and wait whilst it will get steady.

Change Username and Password Using Mywifiext.net
- - It is too easy to change the username and password for your extender using mywifiext. Just a few steps and you are done.
- - Pull up an internet browser and go to the http://mywifiext page.
- - Input the username and password and click on the Log In button.
- - Navigate to the password settings.
- - A window will open with two options namely a new username and a new password.
- - Enter the user ID and passphrase into their respective fields.
- - Finally, click on the Save button to put the changes into effect.
If you want to change the Orbi Wi-Fi Network SSID and Password
To change the Wi-Fi Network SSID and Password you need to login in your Orbi.
Login into your Orbi router with Orbi app or laptop by using your admin details. Click on “Basic” > “Wireless”. You can see the option “Name (SSID)” in the Wireless Network section. Enter the new Wi-Fi SSID that you want to enter.
You can see the option “Password (Network Key)” in the Security Options section. Create a new strong Wi-Fi password in the blank space of 8-63 characters.
Click on Apply to save the changes. Then after few seconds previous SSID will gone and new SSID will show and again you have connect your all the devices with new SSID with the new password.
Facing Problems with MyWifiExt.Net Login
Facing issues with your Netgear Extender Login and looking for a solution on Setup of your Netgear Range Extender? Here is some troubleshooting tips for you to start the extender setup in easy way…
– The obvious step that an individual should take is, immediately restart your devices or you can reset the extender. For this, long press the Reset button for at least 10 seconds.
– If the problem is in your connectivity then check the cables connected among all devices. Modem cable is the main cable to access the internet. Also, check whether the router and extender getting power.
– Next, take a turn to your browser. Is your browser supporting the net or not? If it is not supporting then you can use any other browser such as Mozilla, Google Chrome, Internet Explorer and Safari. If you are using the extender for a long time but the problem appeared suddenly then you can clear the cache and cookie details from your browser.
Most Important Tip: Most of the time the users are suggested to enter the mywifiext.net in the address bar or URL bar but users write it in the search bar. This is the biggest reason of inaccessibility to extender setup page. Make sure to improve this.
-If your net is not working then you can type the IP address 192.168.1.250 in the address bar. It is default local IP address helps the users to easily access extender.
-Always remember to keep your Extender in the midway of your router and device. You can also keep it in the middle of the house. It is recommended that when you are connecting the extender, it should be placed nearby the router while later it can be moved to another place.
Why is orbilogin.net not working on my device ?
Why is orbilogin.net not working on my device ?
A complete solution To access orbilogin.net to log in or setup, up on my device.
-Before Typing the URL orbilogin.net do the login or setup of the Router. The User device (computer/cellphone/Tablet) should be connected to the same router’s wifi network.
-If it shows the same Error that “you are not connected to your router’s WIFI network. Clear the cache memory of your web browser and try to access the routerlogin.net login page once again.
Google Chrome:
For Chrome, go to the browser toolbar, click More Tools and select Clear Browsing Data.
Select the “beginning of time” option and then click Clear Browsing Data.
Safari:
For Safari, from the home screen, Select Settings > Safari.
At the bottom of Safari’s settings screen, Select Clear cookies and data or Clear Cookies and Clear Cache. Confirm when prompted.
Tips: The user Can use the default Ip address 192.168.1.1 or 10.0.0.1 to access the router setup page.

Blue
Your Orbi router and the satellite successfully synced, and the connection between the Orbi and the Satellite is Set it up.
Magenta
Your Orbi router and the satellite successfully synced, and the connection between the router and satellite is fair. You nedd to change the place of the Orbi satellite closer to the Orbi Router
Amber
Sadly, your Orbi router and the sateellite failled to sync. You nedd to move the satellite closer to the router and try again
Mywifiext.local – what is it?
Similar to mywifiext.net, mywifiext.local is mostly used to configure Netgear nighthawk extenders. The innovation and performance of the Nighthawk Extenders are highly advanced. Follow these steps to connect to Mywifiext.local:
1. You can use your computer or a mobile device to access mywifiext.local.
2. It may take the extender up to 1-2 minutes to start up.
3. After turning on the Netgear Nighthawk Extender.
4. To complete the setup procedure, go to https://mywifiext.local setup page.

How do I set up mywifiext.local?
You may install your Netgear Nighthawk wifi extender using mywifiext.local. On MAC or IOS devices alone are you able to access the mywifiext.local setup page. Accessing mywifiext.local is easy if you move on to our next section and thoroughly study it.
To set up mywifiext.local? the following steps:
- Wait for the power light to turn solid after turning on your Nighthawk WiFi Extender.
- Grab a laptop or a smartphone.
- Visit mywifiext.local in a web browser.
- Ensure that your equipment is linked to the nighthawk extender network.
- Follow the instructions displayed on screen to finish the Mywifiext local setup process.
- Place the extender in the chosen spot once the setup is complete.

We Provide guidance with all Type of Model in your Router & Extender Setup

WIRELESS RANGE EXTENDER – wifi setup
- N300
- N600
- AC750
- AC1200
- AC1750
- AC1750
- Nighthawk X4 AC2200
- Nighthawk X4S – AC2600
- Nighthawk X4S DOCSIS
- Nighthawk AC1900
- Nighthawk X6 R8000-100PAS
- Nighthawk Ac2300
- Nighthawk X6S AC4000
- Nighthawk X6 – AC3200
- Orbi RBK40 AC2200
- Orbi Pro – AC3000
- RBS50 Orbi Satellite
- Orbi Pro AC3000.
- AC750
- AC1200
- AC1600
- AC1750
- AC2100
- AC2300
- AC2400
- AC2600
- PL1000
- PL1010
- PL1200
- PL2000
All About Extender Setup
Netgear_ext is the default SSID for getting access to the Netgear WiFi extender. After doing Netgear extender setup through mywifiext.net, you can enjoy the internet by making your device access Netgear_ext SSID.
Both Netgear WiFi extender setup and login processes are fairly easy. However, just like with any gadget, you may occasionally run across quite a few issues with these devices, which can lead to downtime and play a drastic spoilsport for your experience.
WiFi Range Extender N300 Setup

The extender in the event that you need to stretch out your remote sign to arrive at places that have a frail sign to no-flag by any stretch of the imagination. The WN3000RPv3 has a WPS include which permits you to handily interface with gadgets with the WPS ability without expecting to type the remote secret word or run the arrangement wizard.
- - Spot N300 or wn3000rp in a similar room as the WiFi Router.
- - Ensure you have a live web association originating from the principal switch. Additionally, ensure that the switch is WPS able.
- - Attachment the N300 or wn3000rp into an electrical outlet and sit tight for the Power LED Image to become strong. On the off chance that it doesn’t turn ON, press the On/Off catch as an afterthought board of the extender.
- - Press and hold the WPS button for around 2 seconds as an afterthought board of the extender. The WPS LED Image will begin to flicker.
- - Inside 2 minutes, press the WPS button on your switch.
- - The WPS LED Imageon the Extender should go to strong green and the Router Link LED Image should additionally turn strong green to tell you that your extender associated with your primary system
New Router won’t connect routerlogin.net
Don’t worry if you experience your Netgear router won’t connect to the internet. As the issues are not permanent. Follow the steps below to connect it again to the basics:
- - If you see your Netgear router won’t connect, make sure that the modem is working fine.
- - If the modem is working fine, then check the Ethernet ports and connection between your router and modem. Make sure that the connection is not loose.
- - Restart your router and check whether the internet connection is active or not. If it is not connecting, then reset the router.
- - Press and hold the reset button at the back of the router.
- - Hold for about 10 seconds. Once all your LED’s on the router start blinking, then release the button.
- - Wait for a few minutes while your Netgear router gets back to the factory default settings.
- - Now re-configure the Netgear router by the following setup process.


How to Update the Firmware of New or Old Extender?
When you have to update your wifi range extender’s firmware, you need to do the same things you did earlier while configuring it. Those things are placing your extender in the same room as that of the router, the internet connection should be good and the web browser should be updated. When you have assured these things, then you can go on to follow the below-given steps
- - After plugging in your extender and connecting it, open your device and launch a web browser
- - The web browser should be updated.
- - Type the site address new extender setup in the address bar of the web browser
- - When you have accessed the web site you need to log in with the default credentials
- - If you have changed the credentials in the settings earlier then login with the changed credentials
- - When you are directed to the setup page you will be prompted to update the extender’s firmware automatically
- - Click on the link provided and update the firmware of your extender

How to check the firmware version of Orbi Router & Satellite?
On your PC or smartphone, launch a web browser and enter ‘http://orbilogin.com’.
Type in your username and password, which are ‘admin’ and ‘password’ respectively. If you have changed the password, then enter the one, which you have created.
Click ‘Advanced’, then ‘Administration’, and finally, ‘Firmware Update’.
Here you can check if the Orbi Router and Satellite are running on the most recent firmware version.

Why does the wifi extender continue to cause issues even just a firmware update?
Incompatibility:The firmware update might not be fully compatible with the extender model or the existing network setup, leading to conflicts and malfunctions.
Hardware Issues:Sometimes, the issues could be related to hardware problems in the extender itself. A firmware update might not address these underlying hardware issues.
Environmental Factors: Wi-Fi extenders' performance can be affected by the physical environment, such as interference from other devices, thick walls, or distance from the main router.
Interference: Firmware updates can't always mitigate interference from neighboring Wi-Fi networks or other electronic devices, causing signal disruptions.
Improper Update Process: If the firmware update process was interrupted or not completed correctly, it could lead to corrupted firmware, causing issues in the extender's functionality.
Software Bugs: Sometimes, firmware updates may introduce new software bugs that cause unexpected problems.

Reasons to have New extender setup
Poor Signal
-An WiFi range extender boosts signals, but how do you know happens if your wireless router emits weak signals? One of the main issues is that it can lead to drawbacks having the wifi Extender at home.
Lower Speed
-Because of a weak signal, you’re likely to experience lower speeds of your WiFi connection as signals pass over the repeater. The wireless range extender won’t offer the best option in all cases since it is designed to increase the signal to your home , and the quality of your network will become worse.

How to setup Wi-Fi repeater?
Setting up a Wi-Fi repeater is a simple process that can help extend your wireless network's coverage and eliminate dead zones in your home or office. To begin, choose a Wi-Fi repeater that is compatible with your existing Wi-Fi network and supports the necessary Wi-Fi standards. Position the repeater in a location where it can receive a strong Wi-Fi signal from your main router while extending the signal to the desired coverage area. Plug the repeater into a power outlet and connect your computer or mobile device to its network using the provided password. Access the repeater's setup page through a web browser by entering its default IP address. Once logged in, select the "Repeater" mode or a similar option, then scan for available Wi-Fi networks and choose your main Wi-Fi network from the list. Enter your main Wi-Fi network's password to establish a secure connection. You can opt to maintain the same network name (SSID) for the extended network or assign a different one. Save the settings, and the repeater will reboot. Test the connection by moving to the area that previously had weak Wi-Fi signal and check if the signal strength has improved. Now, your Wi-Fi repeater is set up, providing better coverage and a stronger Wi-Fi connection in the extended area.
My Wi-Fi Orbi says no internet. Why
My Orbi indicates no internet is another frequent problem that has many Orbi customers scratching their heads. If your Orbi is not installed correctly or you are not receiving proper internet from your Internet Service Provider, a problem may arise.
Ping the router to which your modem is attached to see whether you are receiving internet from your ISP in order to resolve the Orbi reports no internet issue. If it is not the cause of the issue. Get in touch with our mechanical experts for quick setup of your Orbi.
Installation Orbi Wifi 6 System RBR7550:
- First of all, you need to unbox your Netgear Orbi RBS750. Keep any user manuals or accessories with care.
- Now, choose a clean and dry place to place your Orbi. Find a place where there is an active wall socket available so that you can plug the Orbi device in.
- Next, plug the power adapter into the wall socket and turn the power button on
- It is now time to get hold of your smartphone. Unlock your phone and head toward Play Store or App Store.
- In the search bar, type Netgear Orbi app, and when the search results show up, tap on the correct result to begin downloading the app.
- Right after the Netgear Orbi app is installed, tap on the icon and launch it.
- Accept the terms and conditions by clicking on the ‘I agree’ option.
- After answering a few prompts, you will see a form open up.Fill in the required details and create an Orbi account.
- As soon as the Orbi account has been created, you will be asked to set up your Orbi device. So, keep following the instructions that you view on your screen and get through the process.

Unable To See The Netgear Installation Assistant When Connecting To Netgear_EXT?
-Check your device should be set up to the DHCP.
- Check the LED of your device should convert into the green stable.
- Use the valid IP address that is 192.168.1.250
- If you are going to use mywifiext.net. Once check, it should be spelt correctly.

We provides help all type of model in your router/ extender setup
EX6150,EX6100,EX6200,EX3920,EX3700,WN3500RP,WN2500RP, WN3000RP,WN2000RPT,EX2700,WN1000RP,Netgear EX7000,EX8000
EX2700
This system can cover up to 2500 square feet, making it suitable for big houses or multi-story workplaces. It is compatible with any router and uses tri-band innovation for superior speed and range.
WN2500RP
This system can cover up to 2500 square feet, making it suitable for big houses or multi-story workplaces. It is compatible with any router and uses tri-band innovation for superior speed and range.
EX3700
This unit can cover up to 750 square feet, making it ideal for medium-sized homes or workplaces. It can function as either an extension or an access point thanks to its dual-band innovation. Installation, configuration, and testing are all a part of our setup service to guarantee peak performance.
EX6150/EX6200
This model is ideal for homes and workplaces up to 1200 square feet in size. It can function as either an extension or an access point thanks to its dual-band innovation. Installation, configuration, and testing are all a part of our setup service to guarantee peak performance.
Our trusted extender setup using mywifiext.net
To help you, our team of professionals is on call around-the-clock. Our team is always accessible to assist you in troubleshooting and resolving any difficulties that may emerge since we recognise that network problems can happen at any moment.
Recover Router Password:
To recover a router password, access the router's administration page via a web browser using the default IP address (e.g., 192.168.1.1) or the manufacturer's website. Select "Forgot Password" or "Reset" option, then follow the prompts to reset the password to the default or create a new one.
Update Wireless Driver
To update the wireless driver, first, identify the wireless adapter model in your device's settings. Visit the manufacturer's website or use Windows Update to find the latest driver version compatible with your operating system. Download and install the updated driver to enhance performance, security, and compatibility of your wireless network connection.
Fix Connection Drops
To fix connection drops, start by rebooting your modem and router. Check for any physical damages to cables and connectors. Ensure your router's firmware is up-to-date. Adjust the router's placement for better signal coverage. Disable power-saving mode on your device's network adapter. Reset network settings if the issue persists.
New Extender Setup
New Extender Setup is a process to extend the Wi-Fi range and coverage in your home or office. Plug in the Netgear extender near your existing router and follow the setup wizard on a web browser. Connect the extender to the existing Wi-Fi network and create a new extended network for expanded coverage.
95% First Chat Resolution
95% First Chat Resolution refers to the high percentage of customer inquiries or issues that are resolved satisfactorily during the first interaction with a support agent in a chat-based customer service environment. This indicates efficient and effective support, reducing the need for customers to engage in follow-up interactions.
No Frills, No Gimmicks
"No Frills, No Gimmicks" is a straightforward and simple approach, often used to describe products, services, or marketing strategies. It means offering something without unnecessary embellishments, additional features, or extravagant marketing tactics, focusing on providing the essential benefits to customers.
Download upto 1Gbps
Experience the high resolution streaming and download with mesh wifi sytstem and enhance your comfort.
99% Intenet Uptime
Leave behind the old speed issue of your old generation routers .
24/7 Customer Support
Your problem will resolved in 1 hour if you got any issue regarding connectivity or any other problem by our mechanical support team .
Frequently Asked Questions
Solved your Question and Query Related to Extender Setup.
This sort of issue can happen if the extender doesn’t have the most recent firmware. Procedure: Make sure the extender is associated with the power connector gave and into a live electrical plug. Ensure the extender is inside the Wi-Fi scope of the remote switch and customer device is associated with the extenders organize.
WPS represents Wi-Fi Protected Setup. It is a remote system security standard that attempts to make associations between a switch and remote gadgets quicker and simpler. WPS works just for remote systems that utilization a secret key that is scrambled with the WPA Personal or WPA2 Personal security conventions.
This sort of issue can happen if the extender doesn’t have the most recent firmware. Procedure: Make sure the extender is associated with the power connector gave and into a live electrical plug. Ensure the extender is inside the Wi-Fi scope of the remote switch and customer gadget is associated with the extenders arrange.
Play out a system power cycle by rebooting your fundamental switch and extender. Reconnect to the default WiFi system of your NETGEAR extender. Open the internet browser and re-run the NETGEAR extender arrangement wizard. On the off chance that the issue continues, reset the extender back to the default processing plant settings
Press the reset button on the backboard until the two Link Rate LED and Device to Extender flickers. This takes about 5-10 seconds. …
Release the button.
Wait for the extender to reboot.
Log in with the default password. The default username is (“admin”) and password (“password”).
Another technique is the product strategy.
Associate your PC to the extender with an Ethernet link. You can utilize any of the five Ethernet LAN ports of the extender. Alert: Do not utilize an Ethernet link to associate the extender to a Wi-Fi switch. In the event that you do as such, the extender doesn’t work since it is intended to utilize just a Wi-Fi association with a Wi-Fi switch.